No items found.

Complete Guide to Floor Specialist Services: Installation, Repair, Refinishing, and Commercial Solutions
A floor specialist is a skilled flooring professional who evaluates, installs, repairs, and refinishes a wide range of floor types to maximize performance and lifespan. This guide explains core services: installation, repair and restoration, hardwood refinishing, and commercial flooring solutions so property owners and managers can make informed choices about materials, timelines, and budgets. Many projects fail because subfloor issues, moisture, or improper installation methods are overlooked; a floor specialist mitigates these risks through diagnostic testing, correct material selection, and proven installation workflows. Readers will learn what specialists do, how to choose the right installer, the step-by-step refinishing process including dustless sanding, common repair workflows for water and scratch damage, commercial requirements, and cost drivers that influence estimates. The article uses EAV comparison tables and clear checklists to simplify material trade-offs (hardwood vs LVP vs tile), outlines realistic timelines for common jobs, and presents cost-factor tables to help readers prepare for accurate bids. If you’re deciding between DIY and professional work or comparing materials for a high-traffic space, this hub provides the specialist-level guidance needed to proceed confidently.
What Services Does a Floor Specialist Provide?
A floor specialist provides end-to-end flooring services including material selection, site assessment, subfloor remediation, installation, finishing, repair, and ongoing maintenance contracts; these services reduce lifecycle costs and improve durability. They work across hyponyms such as hardwood floor installation, luxury vinyl plank installation, tile setting and grouting, and carpet installation, applying specific methods and adhesives suited to each material. The specialist role also includes meronym-focused tasks—inspecting subfloor, underlayment, adhesive, planks or tiles, finishes, and grout—to ensure each component functions within the installed system. Understanding this service scope clarifies why hiring a specialist prevents premature failures and preserves warranty conditions, and the next subsection details specific installation offerings for major materials.
Flooring installation services commonly provided by specialists include site measurement, moisture testing, subfloor leveling, layout planning, and manufacturer-compliant installation methods. These steps ensure the finished surface performs as intended and reduce callbacks due to installation errors. The following list summarizes typical installation services to look for when evaluating contractors.
- Site assessment and moisture mapping to determine substrate readiness and mitigation needs.
- Subfloor preparation and repair, including leveling and replacement of compromised sections.
- Material-specific installation: nailing or gluing hardwood, floating LVP installations, thin-set tile setting, and carpet stretching.
These installation services establish the baseline for long-term performance; the next subsection explains how specialists manage repair and restoration when floors are damaged.
Which Flooring Installation Services Are Offered by Floor Specialists?
Floor specialists deliver tailored installation services for each material class—solid and engineered hardwood, Luxury Vinyl Plank (LVP/LVT), laminate, porcelain tile, and carpet—adapting adhesives, expansion gaps, and underlayment choices to substrate and traffic conditions. For solid hardwood, specialists check moisture content, acclimate boards, and use nail-down or glue-down methods as appropriate; for engineered hardwood, they may recommend floating or glue-down systems depending on subfloor type. LVP installations focus on waterproof underlayment and perimeter expansion to accommodate temperature shifts, while tile work emphasizes thin-set mortar, proper trowel selection, and grout sealing for wet areas. Typical timeframes range from a day for small LVP rooms to several days for full hardwood installs, and warranties are often contingent on professional installation. These material-specific installation notes lead directly into how specialists approach repair and restoration when problems arise.
How Do Floor Specialists Handle Repair and Restoration?
Repair and restoration begin with a diagnostic workflow: assess visible damage, perform moisture and subfloor tests, and decide repair versus replacement based on structural impact and cost-effectiveness. Common repair techniques include localized board replacement for hardwood, sanding and spot-filling for scratches, and patching or re-bonding for loose tiles; restoration may involve full refinishing or section replacement when damage is extensive. Specialists prioritize matching species, board profile, and finish sheen to blend repairs seamlessly and often document the process for warranty or insurance claims. Effective restoration workflows hinge on accurate diagnosis, which naturally leads into choosing the right service provider for those jobs.
How to Choose the Right Flooring Installation Service for Your Needs?
Choosing the right flooring installation service depends on project scope, material selection, required certifications, and the provider's portfolio of similar work—these factors collectively predict outcome quality and long-term performance. A specialist’s qualifications matter because installation methods differ by hyponym (hardwood refinish vs tile setting) and each material has unique failure modes tied to meronyms like subfloor and finish. For homeowners, primary evaluation criteria include experience with the chosen material, ability to perform moisture mapping, clear warranties, proof of insurance, and documented project timelines. Below is a checklist to guide selection and to prepare the next section’s material comparison.
When evaluating contractors, ask for specific references, portfolio photos, and explanations of subfloor remediation techniques; confirm whether they use commercial-grade adhesives, dust containment systems, and the correct underlayment for the application. This practical checklist helps separate general labor from specialist expertise and transitions into a material-focused comparison to match materials to rooms and use-cases.
- Verify installer experience with the specific material you plan to use.
- Confirm moisture testing and subfloor prep are included in the estimate.
- Request itemized scope, timeline, and warranty details before signing.
This selection guidance frames the material trade-offs summarized next.
What Are the Benefits of Hardwood, Vinyl Plank, and Tile Installation?
Selecting the right material requires comparing durability, water resistance, installation complexity, cost, and ideal use rooms so the product matches functional and aesthetic goals. The table below compares solid hardwood, luxury vinyl plank (LVP), and porcelain tile across relevant attributes to simplify decision-making.
Different materials suit different rooms and budgets; the table clarifies trade-offs so you can choose the best fit.
| Material | Cost Range | Durability & Wear | Water Resistance | Installation Complexity |
|---|---|---|---|---|
| Solid Hardwood | Moderate–High | High with refinishing possible | Low; not ideal for wet areas | High (nailing/gluing, acclimation) |
| Luxury Vinyl Plank (LVP) | Low–Moderate | High; resilient surface | High; suited for kitchens, basements | Moderate (floating/glue options) |
| Porcelain Tile | Moderate–High | Very high; scratch and stain resistant | Very high; ideal for bathrooms | High (thin-set, grout, sealing) |
This EAV-style comparison shows how lifecycle and location drive choice, and the next subsection explains when professional installation is strongly recommended.
When Should You Hire a Professional Flooring Contractor?
Professional installation is recommended when projects involve complex layouts, moisture-prone areas, warranty-triggering manufacturer requirements, or subfloor remediation that affects structural integrity. DIY may be feasible for simple floating LVP installs in stable environments, but professionals bring moisture mapping, adhesive selection, and pattern work experience that lowers long-term costs. Hiring a contractor is also wise for large multi-room projects, staircases, and commercial sites with code or acoustic requirements. Understanding these scenarios helps you weigh immediate cost savings against lifecycle value and leads into the specialized refinishing practices that preserve hardwood over decades.
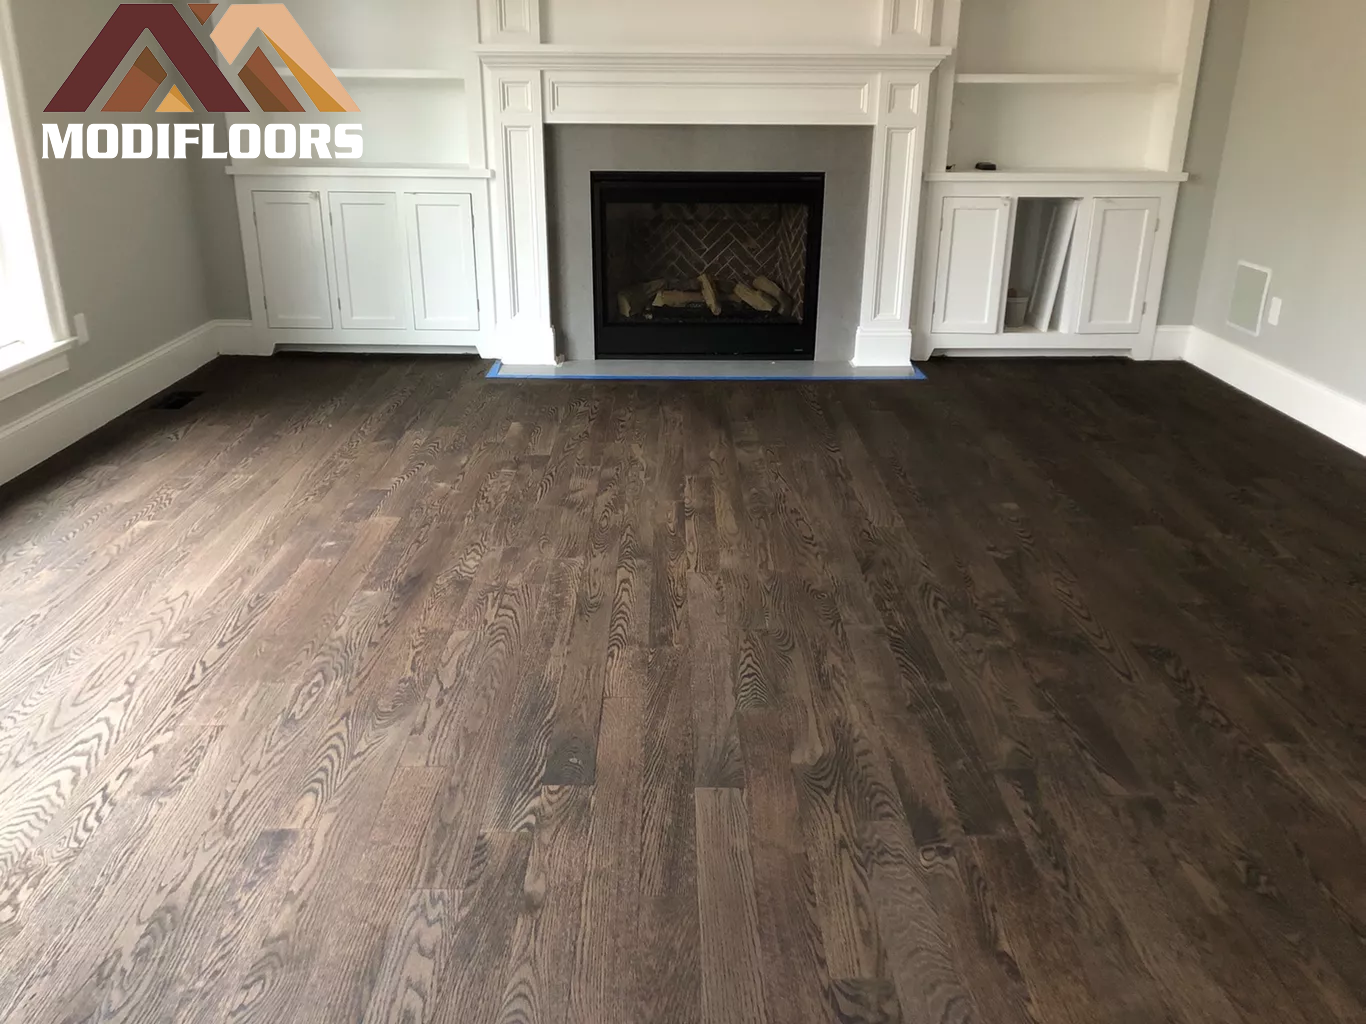
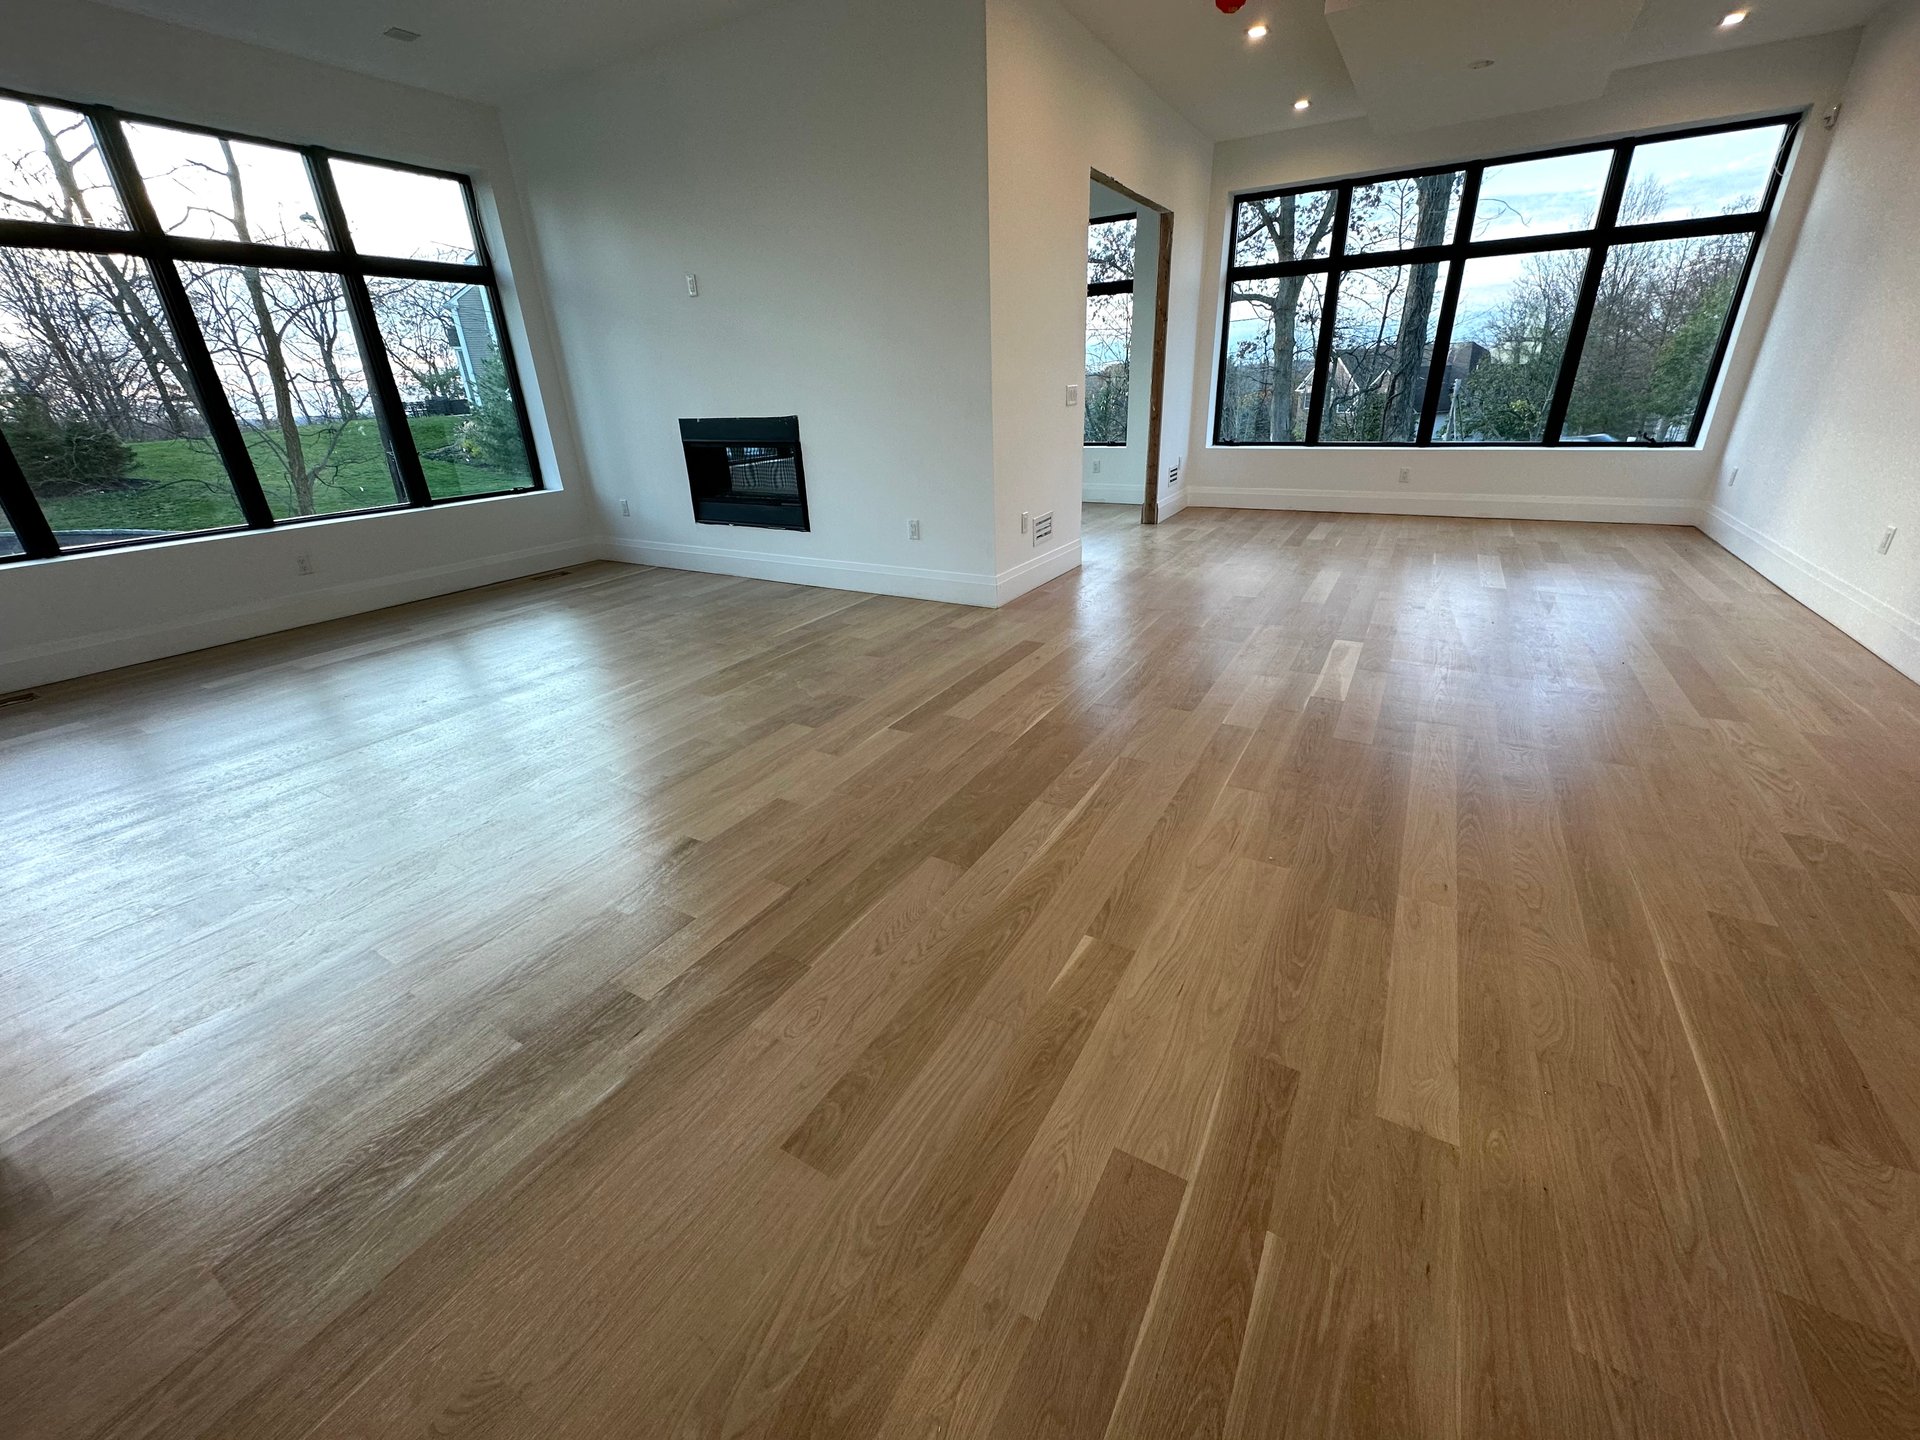
What Are the Key Steps in Hardwood Floor Refinishing and Maintenance?
Hardwood floor refinishing involves assessment, dustless sanding or screening, optional staining, and sealing with an appropriate finish; this process restores surface aesthetics and renews wear-layer protection. The mechanism—mechanical removal of surface wear followed by sealing—improves appearance and extends lifespan by reestablishing finish barriers against abrasion and moisture. Proper refinishing requires correct grit progression, attention to edge work, and controlled drying conditions for the chosen finish; with these safeguards, homeowners regain years of service from existing planks. The following numbered workflow and supporting table explain the steps, required tools, and typical time expectations to set realistic project timelines.
Refinishing workflow summary:
- Assessment and moisture check to confirm suitability for refinishing.
- Sanding (coarse to fine) or screening for light wear, using dust containment.
- Staining (optional) and sealing with water- or oil-based finishes.
- Final cure and reinstallation of trim and transitions.
These steps clarify what to expect during a refinish and transition into the table outlining tools, materials, and time per step.
| Step | Required Tools/Materials | Typical Time / Outcome |
|---|---|---|
| Assessment & Moisture Testing | Moisture meter, inspection tools | 1–2 hours; determines feasibility |
| Sanding & Edge Work | Dustless sanding equipment, abrasives | 1–3 days; removes finish & surface wear |
| Staining (Optional) | Stain, applicators, rags | 2–4 hours plus drying; adjusts tone |
| Sealing & Curing | Finish (polyurethane/alkyd), applicators | 1–3 days drying; restores wear layer |
This EAV table sets expectations for scheduling and resources, and the next subsection explains how dustless sanding changes the process and outcomes.
How Does Dustless Sanding Improve Hardwood Floor Refinishing?
Dustless sanding employs industrial sanders connected to high-efficiency vacuum systems that capture the majority of airborne dust, reducing cleanup time and improving indoor air quality compared to traditional sanding. The mechanism involves negative pressure and multi-stage filtration, which traps fine particles that would otherwise settle on surfaces or escape into HVAC systems. Benefits include faster project turnover, reduced post-job cleaning, and safer conditions for occupants with respiratory sensitivities; however, equipment rental and setup can increase short-term cost. Understanding dustless sanding positions owners to request it in estimates when indoor air quality and speed are priorities.
What Are Best Practices for Hardwood Floor Care and Longevity?
Maintaining hardwood longevity requires routine cleaning, humidity control, protective measures, and periodic inspection to catch issues early before they necessitate major repairs. Use pH-neutral cleaners, avoid steam mops that can raise moisture, employ furniture pads and area rugs in high-traffic zones, and maintain indoor humidity between recommended ranges to prevent cupping or gaps. Scheduled spot repairs and periodic screening or recoating keep finishes functional longer and delay full refinishing cycles; this maintenance logic connects directly to how specialists handle common repairs like water damage and scratches.
How Do Floor Specialists Repair Common Flooring Issues?
Floor specialists follow diagnostic-first strategies when addressing common problems such as water damage, scratches, squeaks, tile cracks, and grout failure; proper triage ensures repairs target root causes rather than symptoms. For example, water damage requires moisture mapping and drying before any repair to avoid trapping moisture under new materials, while scratch repair may use screening and spot-filling to preserve finish continuity. The problem-solution approach reduces recurrence and informs whether partial repair or full replacement is most cost-effective, and the next subsection provides actionable immediate steps and repair timelines.
When confronting water damage or deep scratches, immediate mitigation and structured repair sequencing limit further deterioration and prepare the site for restoration. Follow these immediate-action steps:
- Remove standing water and ventilate the area using dehumidifiers to stabilize moisture levels.
- Lift baseboards and assess subfloor and joist conditions to detect structural compromise.
- Document damage for insurance if applicable, then execute targeted repairs (board replacement, subfloor remediation) once dry.
These mitigation measures protect the structure and set the stage for permanent repairs explained next.
What Are Effective Solutions for Water Damage and Scratch Repair?
For water infiltration causing cupping or buckling, specialists prioritize drying with dehumidification and moisture testing, then replace or repair affected boards and address subfloor or vapor barrier failures to prevent recurrence. Scratch repair options range from minor screening and recoating for surface damage to board replacement for deep gouges; finish blending and color matching are critical to a seamless repair. Timelines vary: drying can take days to weeks depending on conditions, repairs can range from a day for localized scratch fixes to several days for board replacement and refinishing. Proper sequencing—dry, repair substrate, then finish—reduces the risk of trapped moisture and promotes lasting results.
How Is Tile Floor Repair and Grout Sealing Performed?
Tile repair typically involves removing damaged tiles, preparing the substrate with appropriate thin-set mortar, re-setting new tiles with correct spacing, and re-grouting followed by grout sealing to prevent staining and moisture ingress. Key materials include correct porcelain tile adhesives, grout compatible with expected movement, and a penetrating grout sealer selected for traffic and wet conditions. Re-grouting and sealing are preventive measures that extend tile life and reduce maintenance; scheduled resealing intervals depend on use and sealer type but are a small investment compared to tile replacement. Understanding these repair mechanics explains why specialist installation and maintenance preserve tile longevity.
What Commercial Flooring Services Do Floor Specialists Offer?
Commercial flooring services focus on durability, rapid installation, compliance with building codes, and minimizing business disruption, covering options such as carpet tile, commercial LVT, epoxy coatings, rubber flooring, and heavy-duty hardwood installations. Specialists manage project logistics—phasing, staging, and coordination with other trades—to maintain business continuity and meet safety standards. Commercial projects also emphasize lifecycle cost, slip-resistance, acoustics, and warranty structures tailored to higher foot traffic and equipment loads. The next subsection contrasts office and retail installations to illustrate how use-case influences material choice and project planning.
How Are Office and Retail Flooring Installations Different?
Office installations emphasize comfort, slip reduction, sound attenuation, and modular repairs, often favoring carpet tile or commercial-grade LVT with acoustic underlay, while retail spaces require hard-wearing surfaces, high abrasion resistance, and fast installation methods to reduce downtime. Retail projects may use heavy-duty adhesives and reinforced substrates to handle shelving and customer traffic; offices typically negotiate phased installs to avoid full closures and preserve employee productivity. Understanding these differences ensures the material choice aligns with operational priorities and prepares stakeholders for scheduling and maintenance commitments.
Why Choose Specialized Commercial Flooring Contractors?
Specialized commercial contractors bring certifications, insurance, project management, and experience with commercial-grade adhesives and substrates required by building codes and warranty terms. They coordinate multi-trade schedules, apply appropriate slip-resistant finishes, and provide maintenance contracts to protect business operations and asset value. Credentials and process controls reduce risk and ensure installations meet life-safety and accessibility standards, which is essential for public and high-capacity spaces. This commercial expertise also has clear cost implications detailed in the final cost-focused section.
How Much Do Floor Specialist Services Cost and What Factors Affect Pricing?
Floor specialist pricing depends primarily on material selection, labor complexity, subfloor remediation, removal and disposal, project accessibility, and regional labor rates; understanding these factors helps set realistic budgets and compare estimates. Costs are influenced by hyponyms like stair installations, pattern work (herringbone), and transitions which add labor and material cost, while meronyms such as underlayment and adhesives represent hidden line items. The following EAV-style table breaks down services, cost factors, and typical impact ranges to make quote comparisons transparent.
| Service | Cost Factor | Typical Range or Impact |
|---|---|---|
| Installation (per sq ft) | Material choice (LVP vs hardwood vs tile) | Low–High; material drives base price |
| Subfloor Prep | Leveling, replacement, moisture mitigation | Moderate–High; can double labor time |
| Removal & Disposal | Old flooring removal and waste hauling | Low–Moderate; variable by access and disposal rules |
This table clarifies how different factors shift costs, and the next subsection provides practical tips for getting accurate estimates.
What Influences the Cost of Flooring Installation and Repair?
Material costs versus labor rates are the dominant variables—premium woods and large-format tiles increase material budget while complex layouts and pattern installs increase labor time; subfloor repairs and moisture mitigation can be the largest unpredictable expenses. Accessibility (stairs, long carries), special trim or transition pieces, and code or permit requirements also increase costs. Regional labor markets and the need for specialized equipment (dustless sanding systems, lift rental) further influence final bids. Knowing these drivers helps property owners ask targeted questions during estimates to avoid surprises.
How Can You Get a Free Estimate or Consultation from a Floor Specialist?
Prepare for an estimate by assembling measurements, photos of the space and substrate, a description of current issues (scratches, moisture stains), and a target budget and timeline to guide the estimator; clear preparation speeds up on-site assessments. During a consultation expect moisture testing, subfloor inspection, notes on pattern or trim preferences, and an itemized written quote that separates materials, labor, and contingency for subfloor work. Compare multiple itemized quotes, check that warranties and scope are spelled out, and ask for projected timelines and cure times to align expectations. Thorough preparation and clear comparison criteria yield better decisions and smoother projects.
- Prepare visuals and measurements: Photos and approximate square footage help estimators provide accurate preliminary guidance.
- Request itemized quotes: Separate line items for materials, labor, subfloor work, and disposal improve comparability.
- Confirm testing and warranty inclusions: Ensure moisture testing and finish warranties are included in the written proposal.
These steps lead to better procurement outcomes and conclude this specialist-level guide to flooring services.